Using the Manager’s Dashboard
1. Where do I find the Manager’s Dashboard?
“Manager” credentials (which are initially granted by Dynasend) provide accessibility to the “Manage Signatures” dashboard. There are two ways of reaching the manager’s dashboard:
Login through the O365 add-in: Open the taskpane in Outlook and click “Edit Signature”.
Direct login: https://manage.dynasend.net/admin/dashboards/main.
Once logged in, you’ll find the tab at the top of the screen:

2. What features / tools does the Manager’s Dashboard proivde?
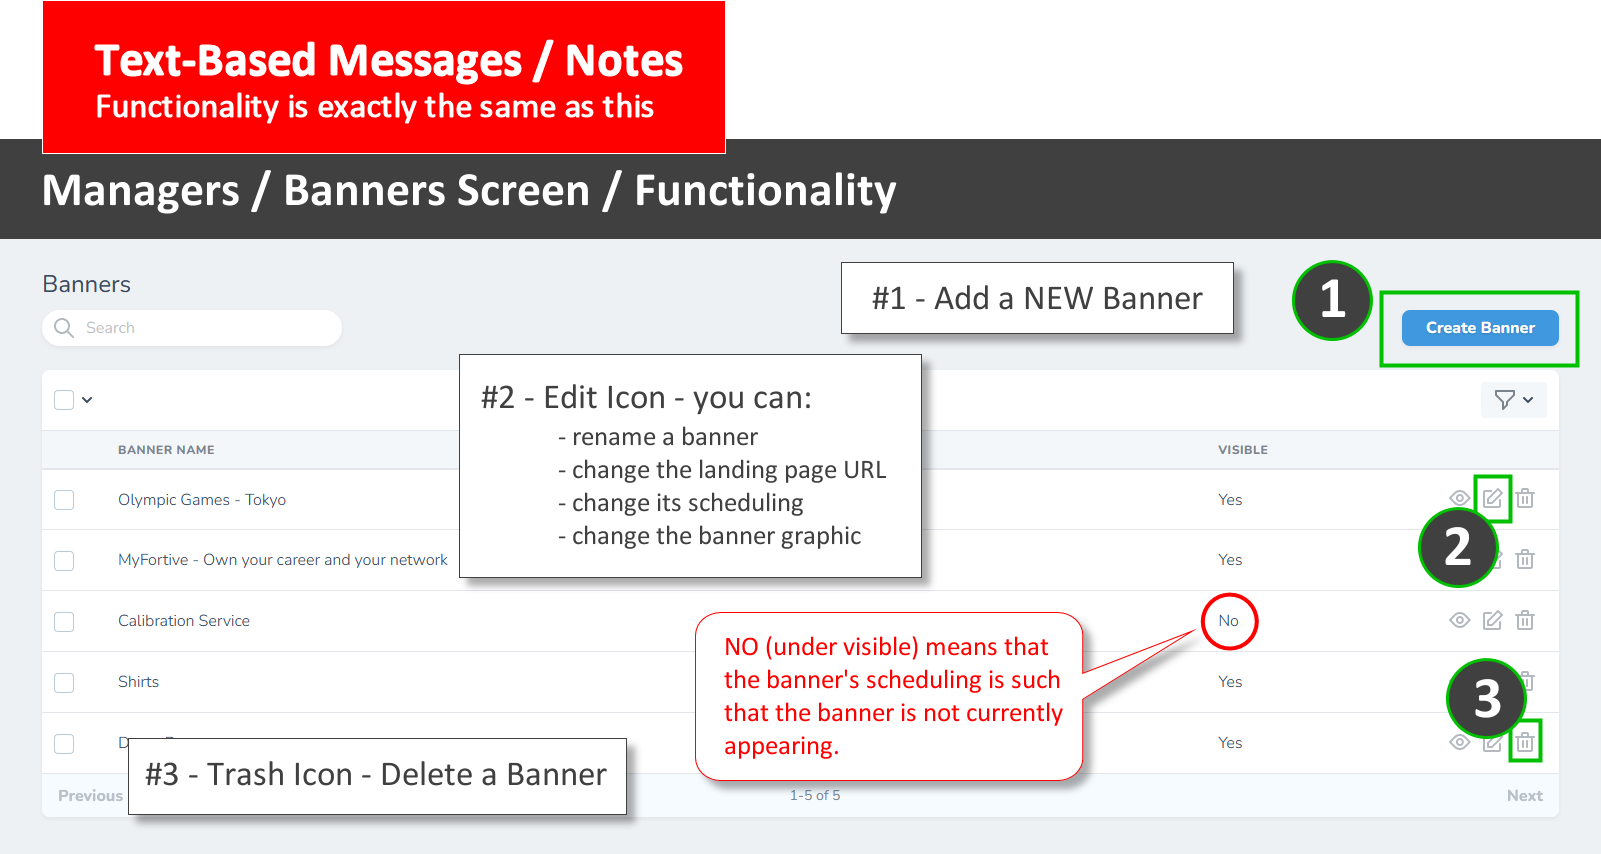
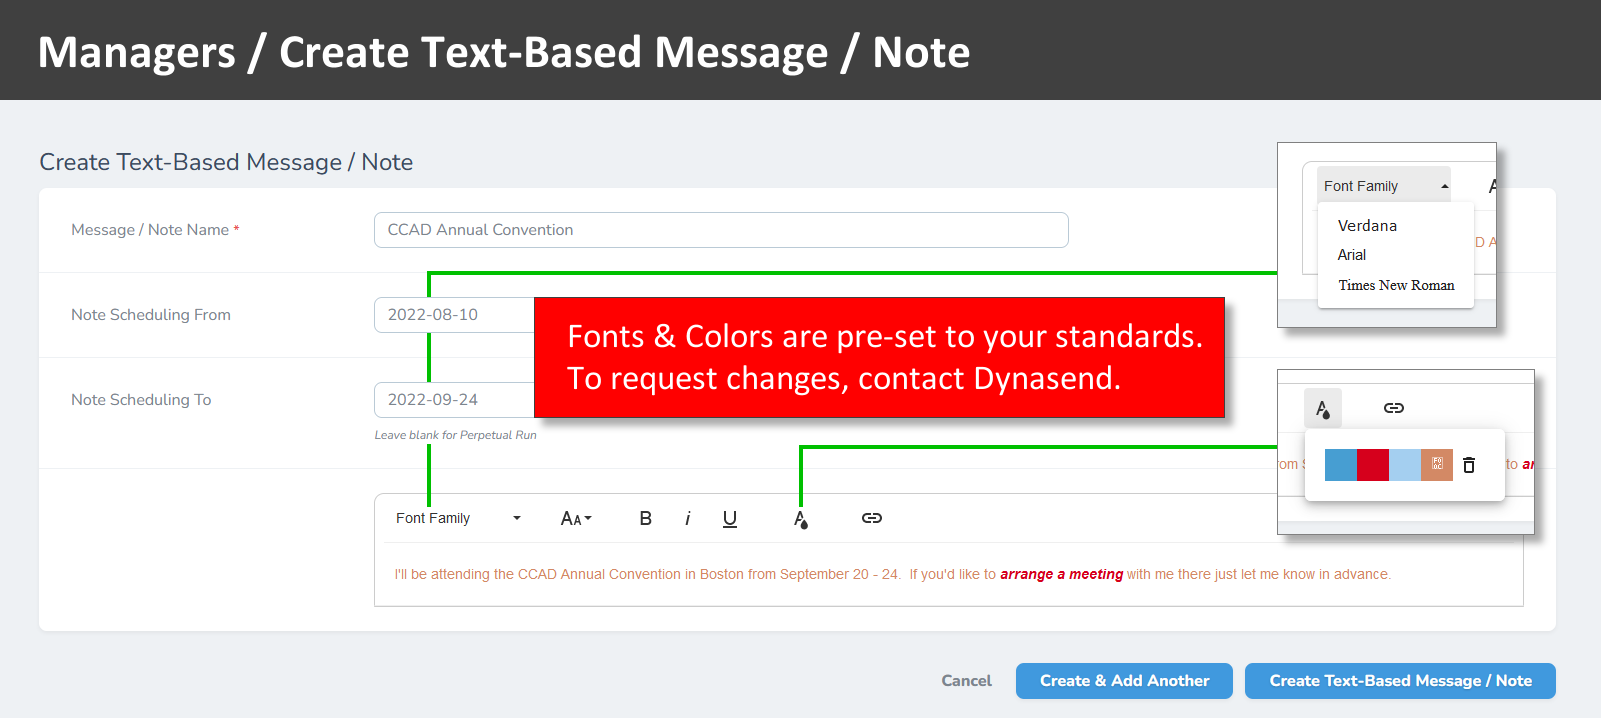
Options, found in the left menu, include:
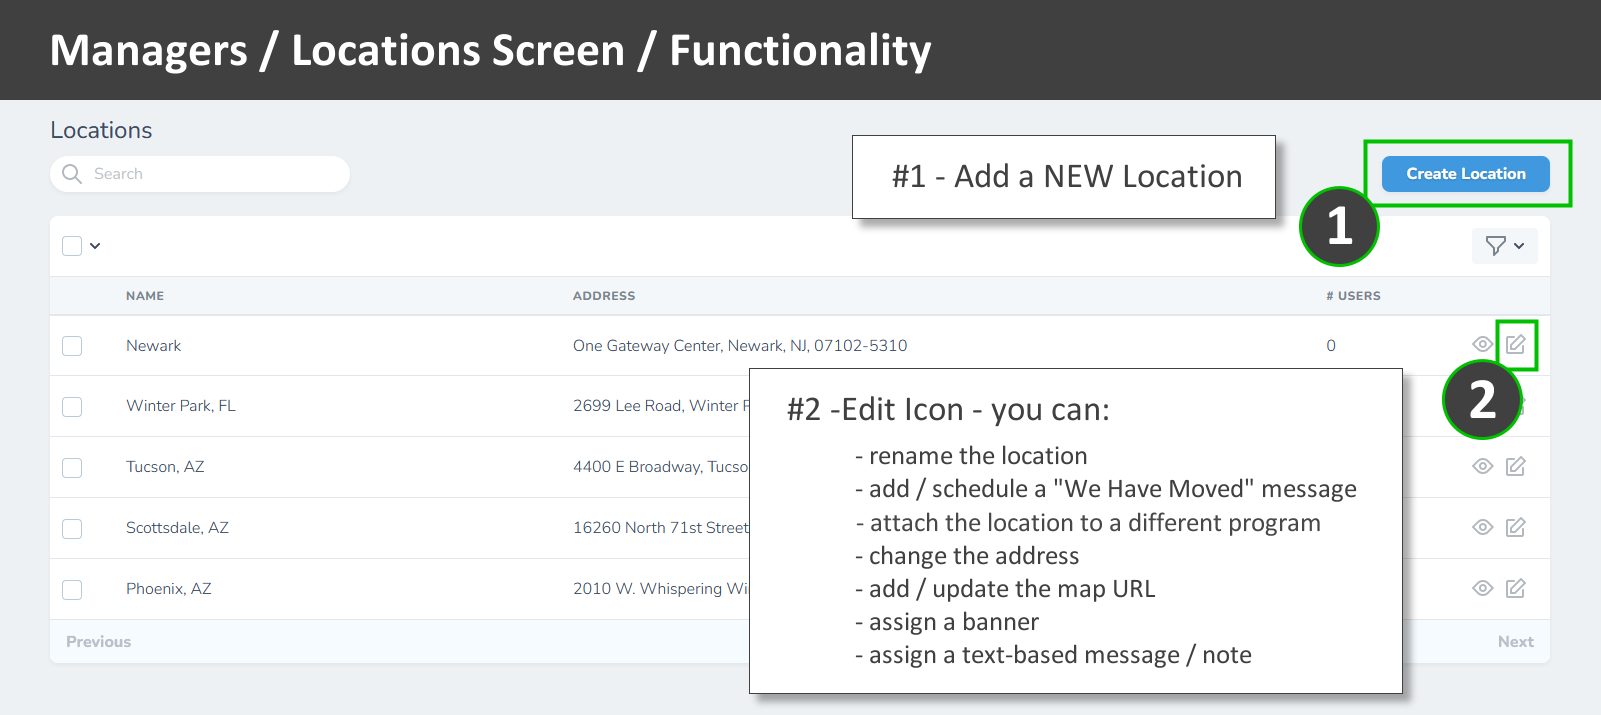
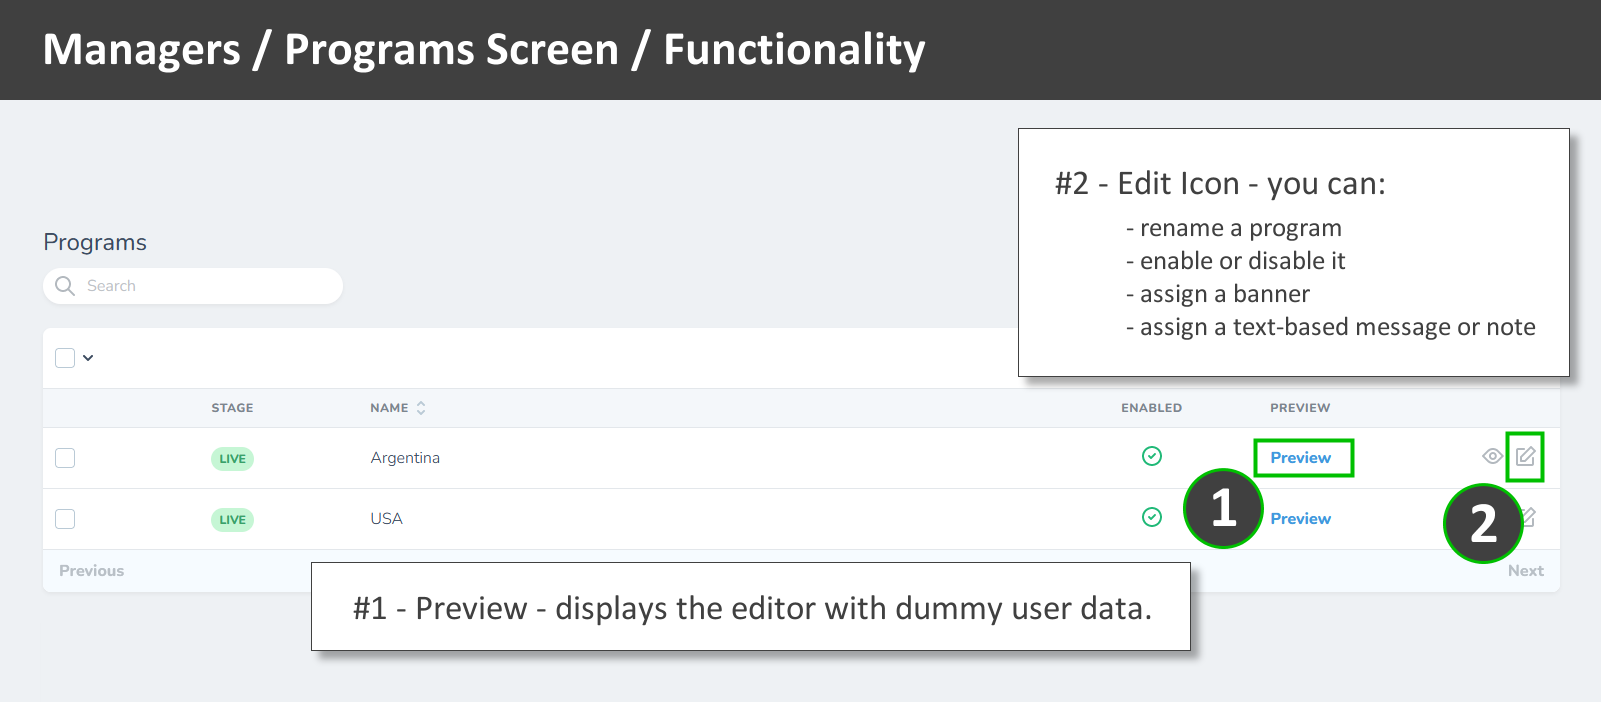
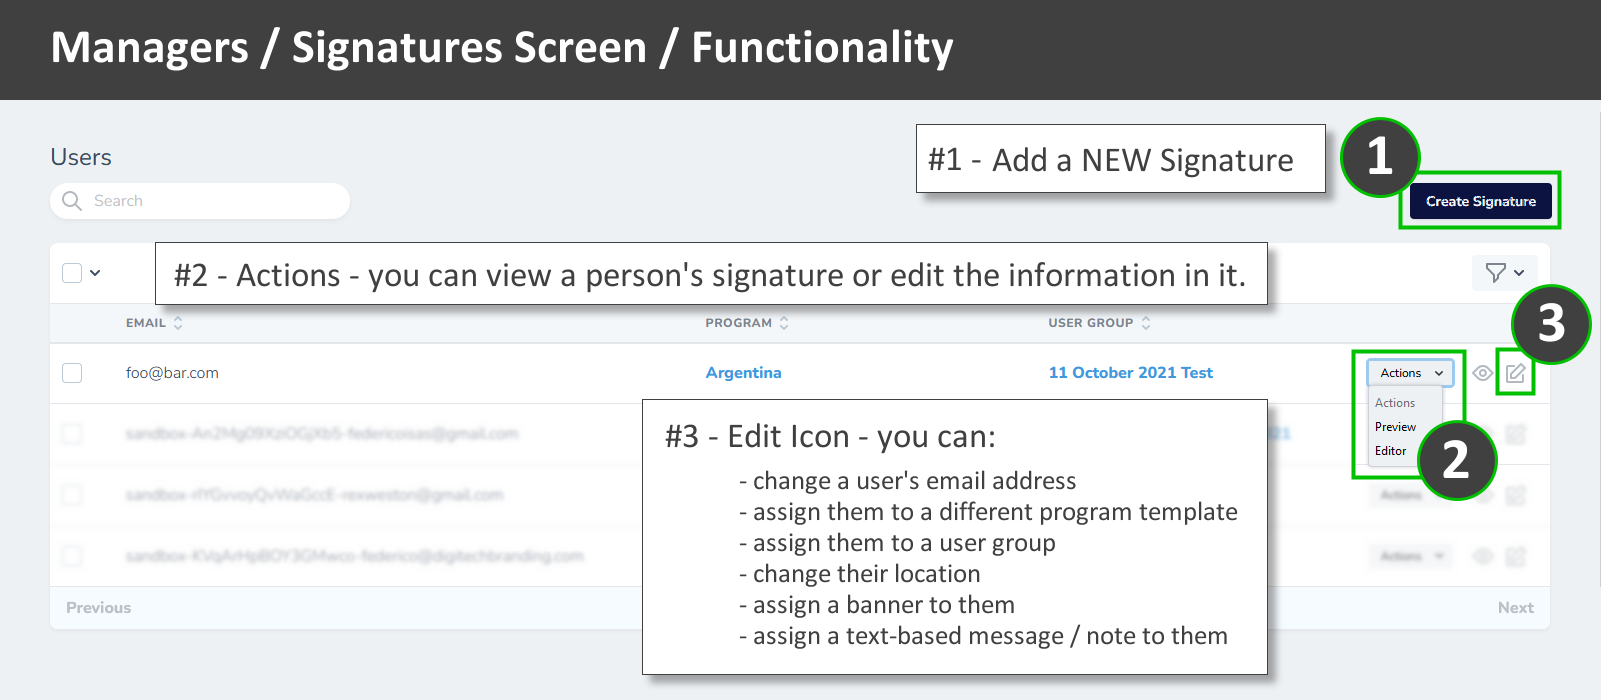
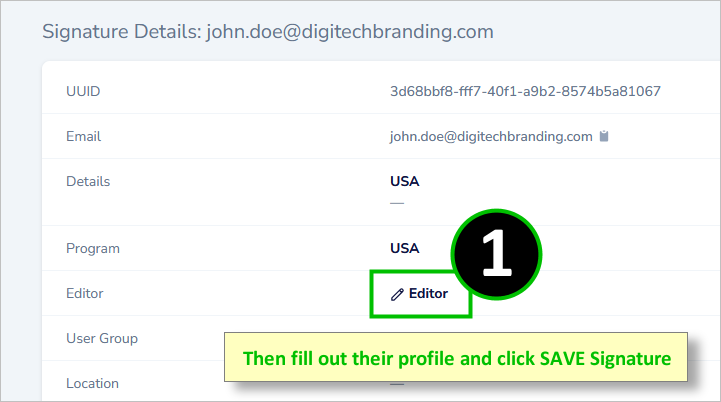
3. How do I create a signature for a new user?


4. How do I set up my subscription, manage billing, review invoices, etc.?
Click “Create Subscription” or “Manage Billing” in the left menu:
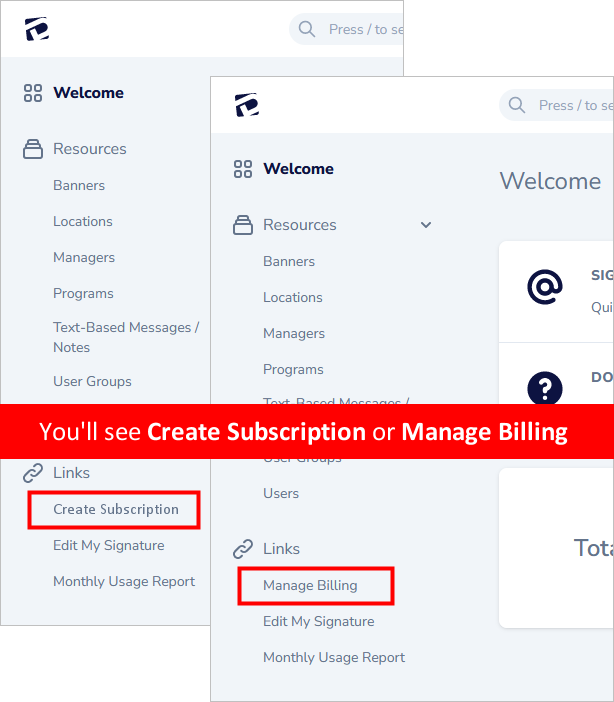
This will open up the billing profile page:
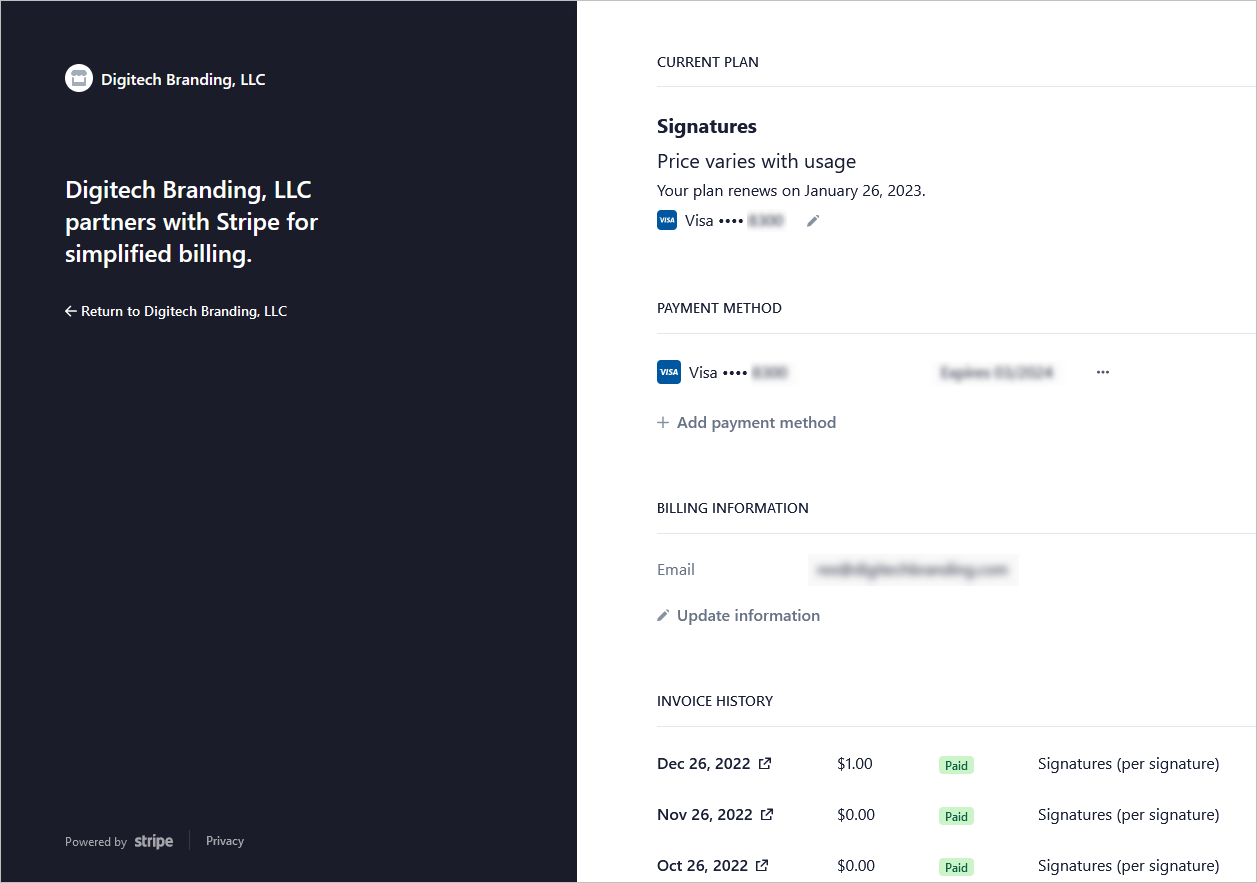

If you would prefer to receive monthly invoices that you can pay by credit-card, ACH transfer, or check, on your own schedule, please email us here and we will set your account up that way (instead of automatically charging the credit card you have on file). NOTE: You will still have to set up your payment profile using a valid credt card, but it will not be charged.
5. What service do you use for payment processing and are they secure?
We utilize Stripe.
Stripe is PCI-DSS compliant: Stripe is certified as a Level 1 Service Provider, which is the highest level of certification for payment processors. Stripe complies with the Payment Card Industry Data Security Standard (PCI-DSS), a set of security standards established by major card brands like Visa, Mastercard, and American Express. This compliance ensures that Stripe maintains a secure environment for handling credit card data.
Stripe uses data encryption: Stripe employs strong encryption methods to safeguard data transmission. All communication between customers, businesses, and Stripe servers is encrypted using industry-standard TLS (Transport Layer Security) encryption. This ensures that sensitive data processed by Stripe, such as credit card details, are securely transmitted over the internet.
Stripe utilizes tokenization: Stripe uses tokenization to enhance security. When a customer makes a payment, their credit card information is replaced with a unique token. This token is used by Stripe for subsequent transactions, eliminating the need to store sensitive card details on the merchant’s servers. As a result, even if a merchant’s systems are compromised, the tokenized data alone is useless to potential attackers.
Stripe employs two-factor authentication (2FA): Stripe offers the option of enabling two-factor authentication for account access. This adds a high degree of security by requiring users to provide a second form of verification, such as a unique code sent to their mobile device, in addition to their regular login credentials.
Stripe ensures fraud prevention: Stripe’s advanced machine learning algorithms detect and prevent fraudulent activities. Using these algorithms, Stripe analyzes various data points, such as transaction patterns, IP addresses, and user behavior, to identify suspicious transactions and mitigate potential risks. Additionally, Stripe provides tools and features that allow businesses to implement customized fraud prevention rules and measures.
Stripe performs security audits and monitoring: Stripe performs regular security audits and assessments to identify and address potential vulnerabilities. The company has a dedicated team of security experts who continuously monitor the platform for any suspicious activities or threats. This proactive approach helps ensure the ongoing security of the payment platform.
Stripe follows compliance and regulatory standards: To guarantee your business’ safety, Stripe adheres to various compliance requirements, including GDPR (General Data Protection Regulation) in Europe and other applicable data protection laws. By complying with these regulations, Stripe ensures the protection of personal data and privacy for its customers.
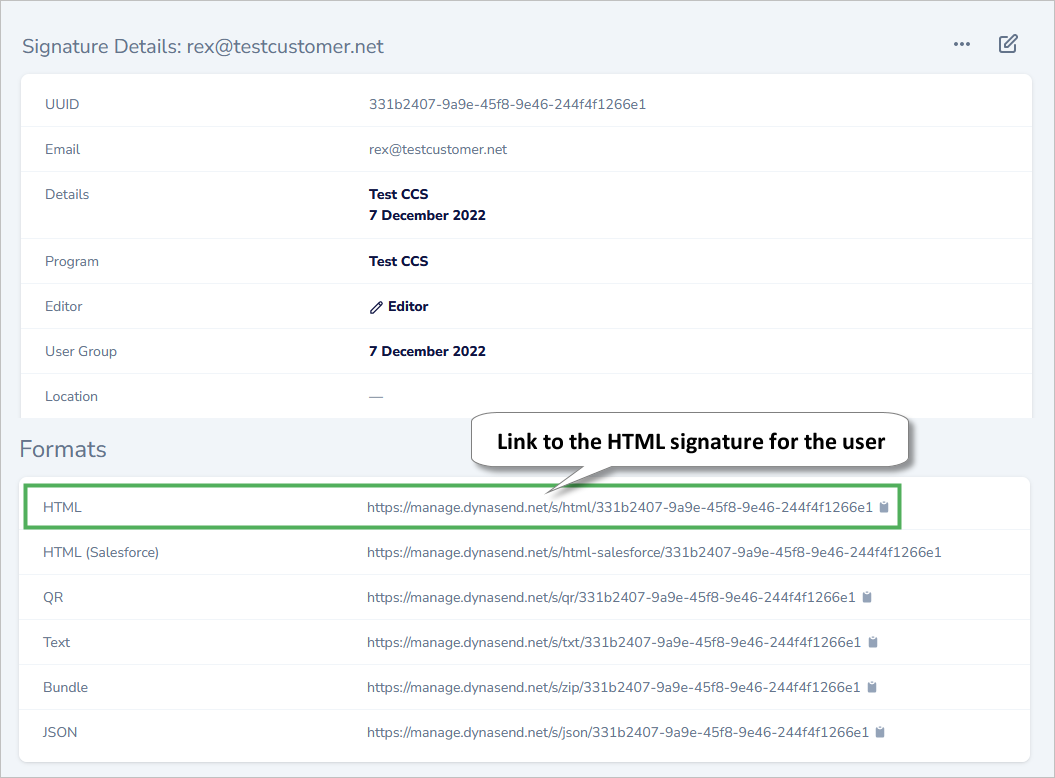
6. How do I locate the URL for a user’s HTML signature?
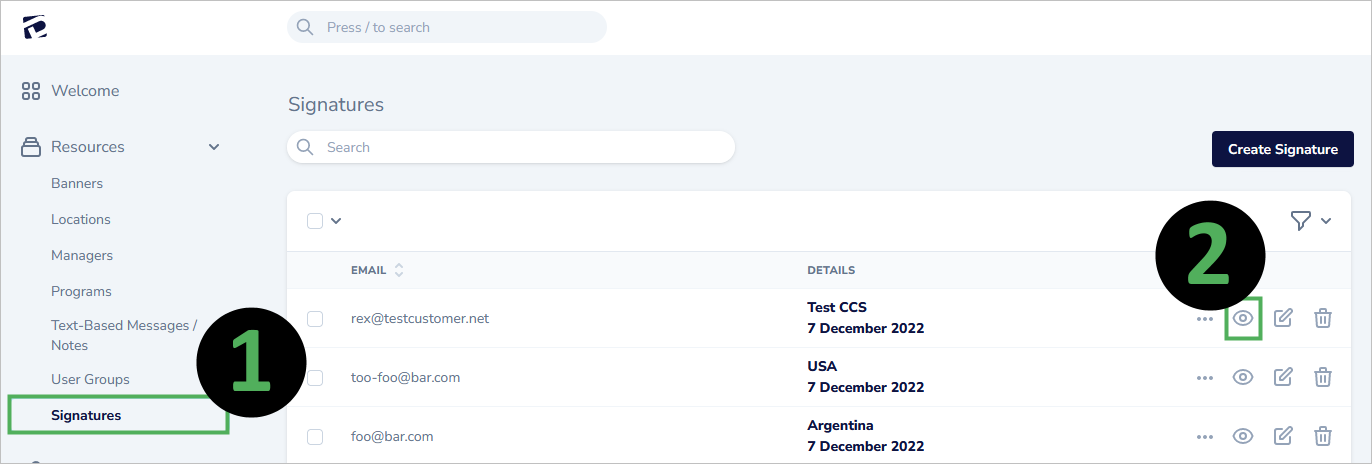
7. How do I grant “Manager Credentials” to another user?
- Navigate to the “Users” screen.
- Click the three-dot menu and then “Change role”.
- Use the drop-down to select the role you want to assign.
- Click “Run Action”.
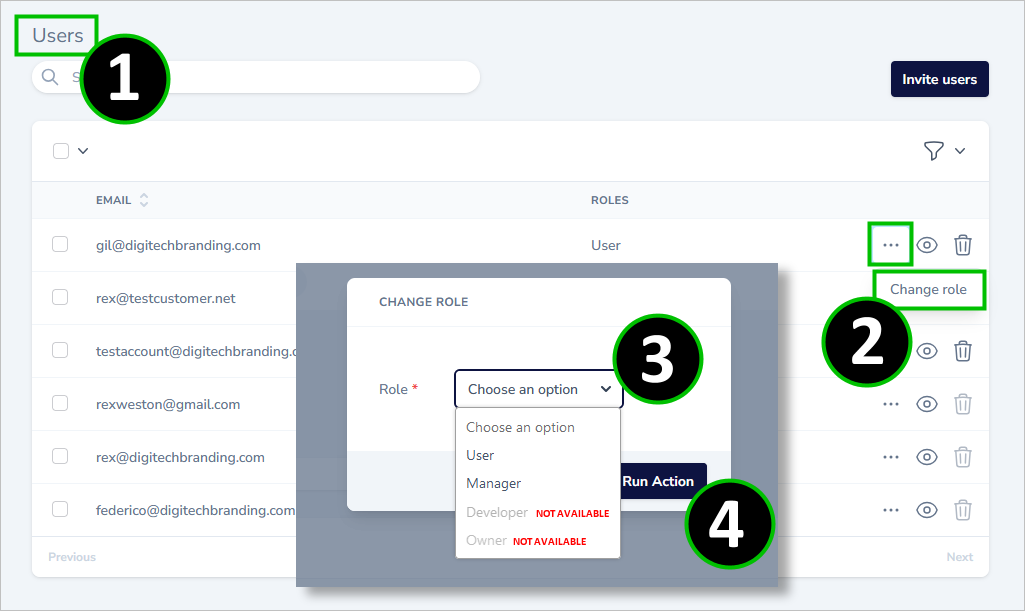
Note: If the person you want to grant the manager credentials to is not listed as a user, you can send them an invite.
8. How do I create and attach a new location?
There are two parts to creating locations. First you must create it, using the LOCATIONS functionality.

Then, after it’s been created, it has to be ATTACHED to the correct signature program.
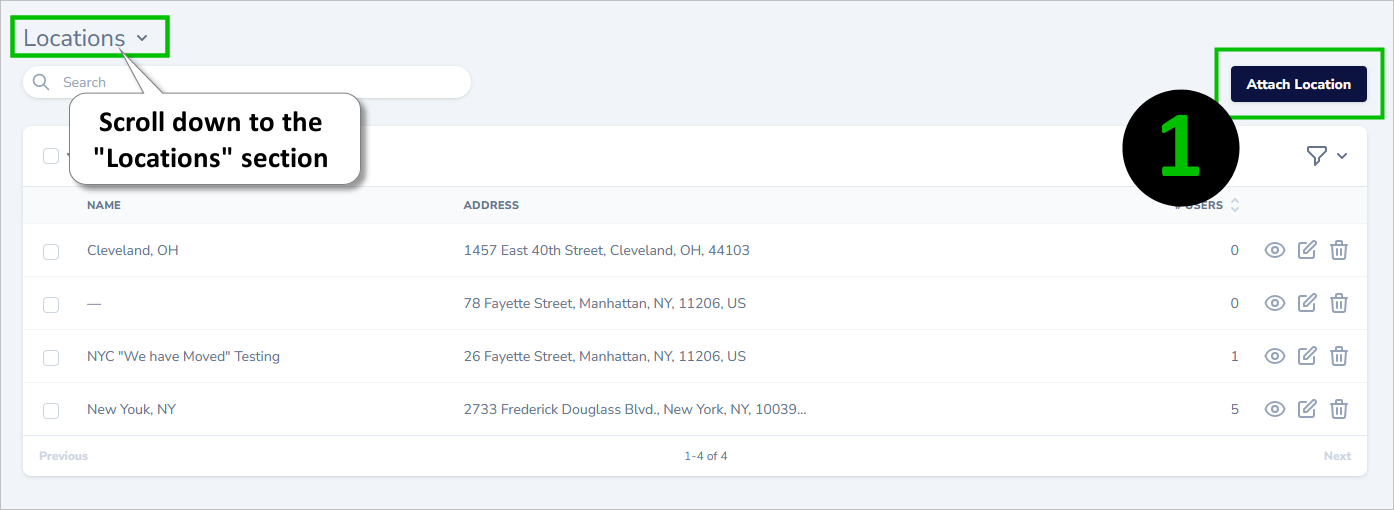
First, view the PROGRAM that you want to attach the location to - “USA” in this example:

You’ll be on the PROGRAM > DETAILS page, scroll down to the Locations section and click Attach Location:
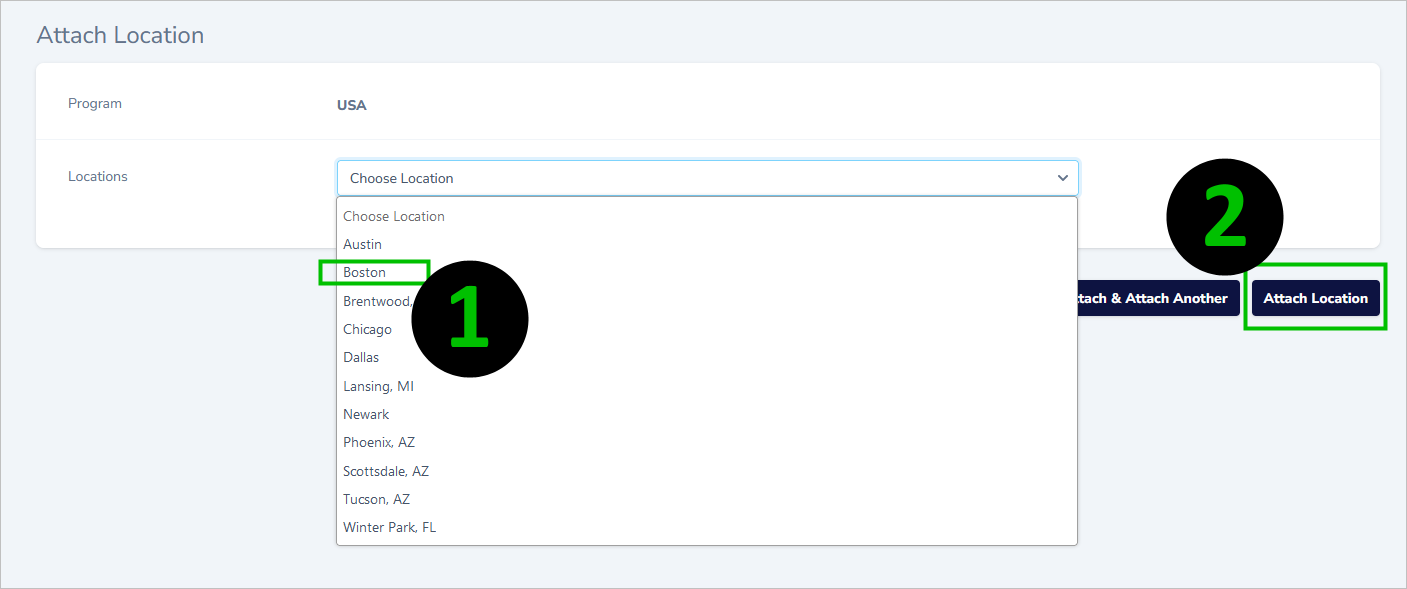
Select the location that you’ve just created, and click Attach Location:
9. I can’t create a signature for a user because their email address has “already been taken”, but when I search for them, I can’t find them. What can I do?
The scenario here is that you are trying to create a new signature and are seeing this message:

but when you search your signatures for them, they are not found:
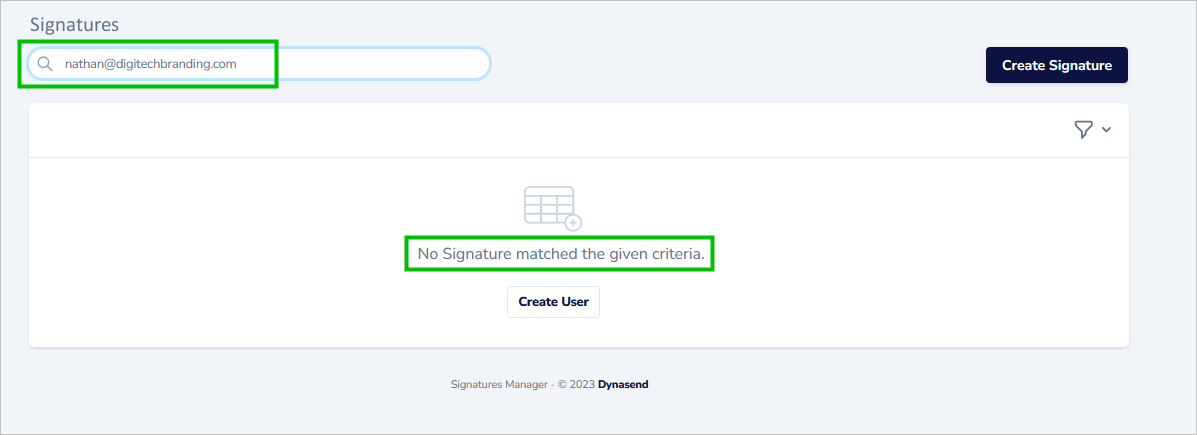
In this case, the thing to do is to click the filters (funnel) icon and select “with trashed”:
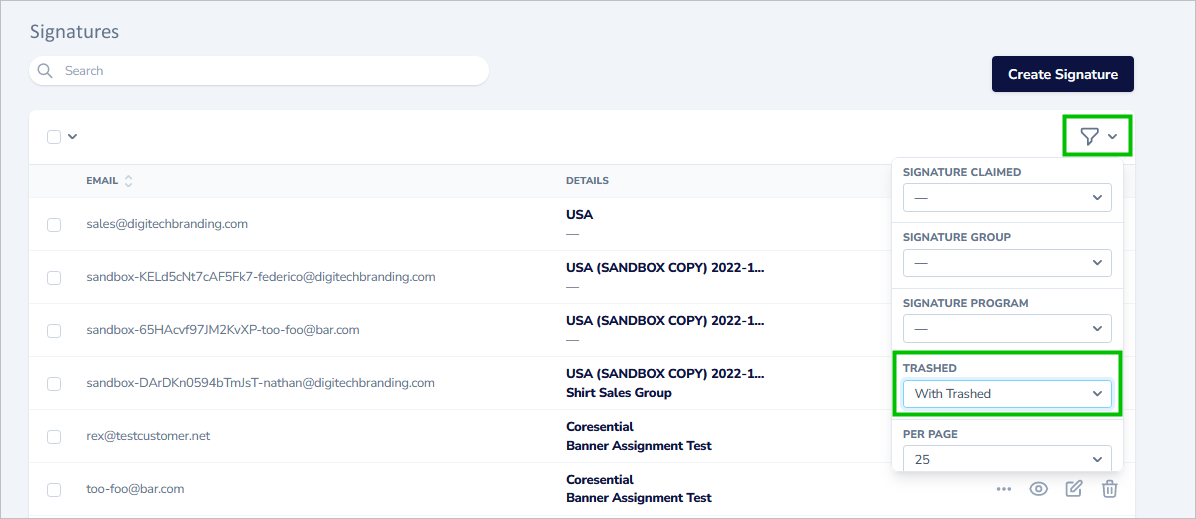
Then search for them again. It’s likely that you will now see their email address. What you need to do is to RESTORE it by first clicking the circular arrow icon:

and then clicking RESTORE when the “Restore Resource” dialog appears:

10. How do I edit a location?
Navigate to the location you wish to edit as shown here:
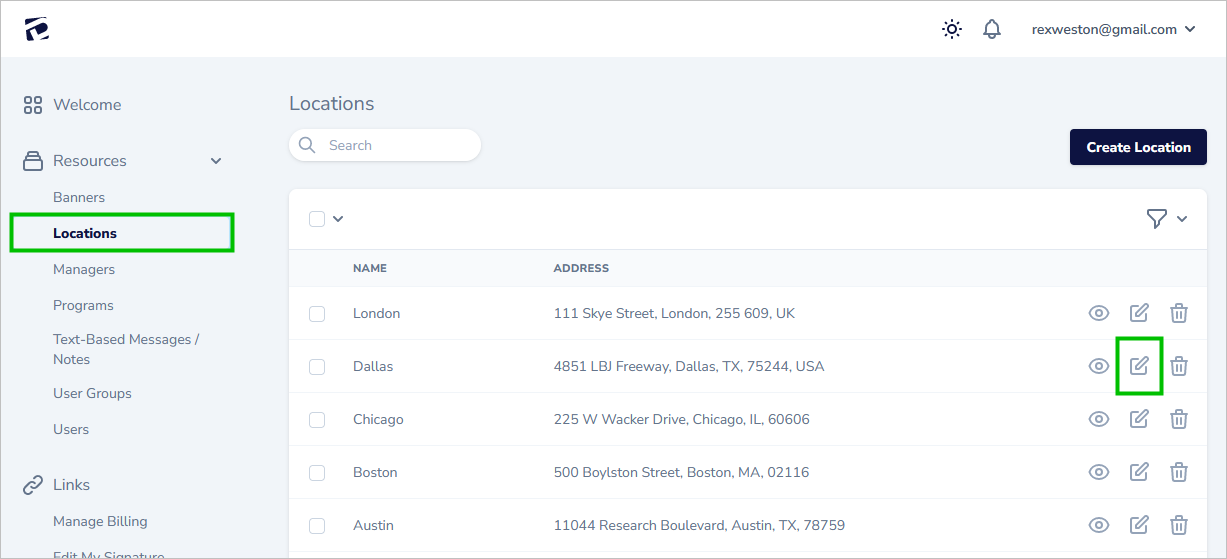
After you click the “edit” icon, you will be able to edit the location data. Make your changes and then click the UPDATE LOCATION button found at the bottom of the form.
11. How can I access the various files that Dynasend creates (.VCF / .HTML / .TXT / etc.)?
Click into the SIGNATURES screen and click the view icon for the user of interest:
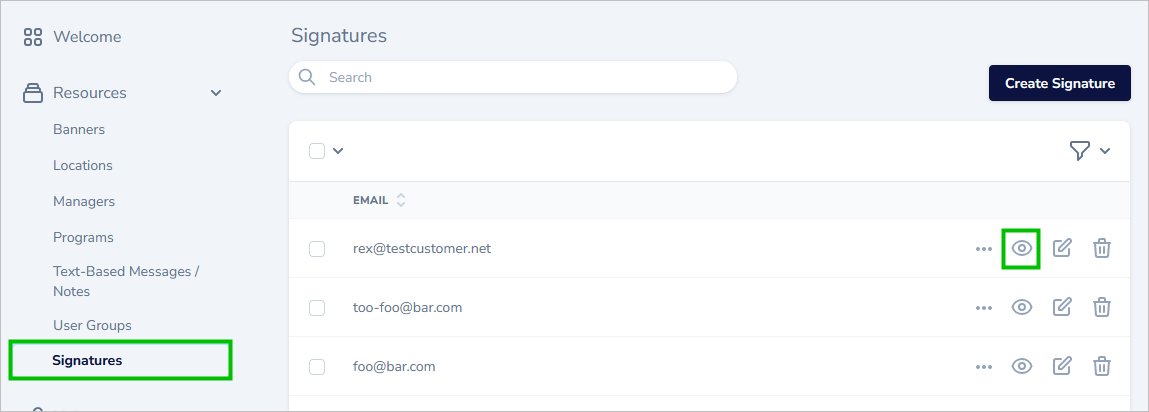
Scroll down to the “Formats” section and click “Show All Fields”:

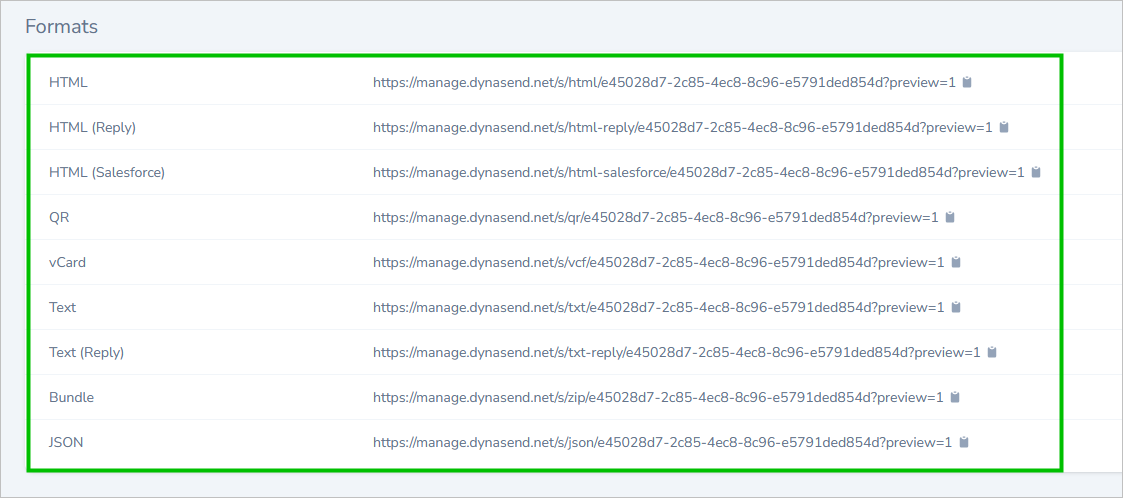
There you will find links to all of the various files that Dynasend creates for a user’s signature:
12. I need to add new social media icons - what should I do?
Simply email us here and let us know what you need and we will take care of it for you.
13. I need to update the logo in our signature - what should I do?
Simply email us here and let us know what you need and we will take care of it for you.
14. I’d like to change the layout of our signature - what should I do?
Simply email us here and let us know what you need and we will take care of it for you.
15. I’d like to add a new data field / fields to our signature program - what should I do?
Simply email us here and let us know what you need and we will take care of it for you.
16. I need to make other changes to our signature program but can’t see a way to do it - what should I do?
Simply email us here and let us know what you need and we will take care of it for you.
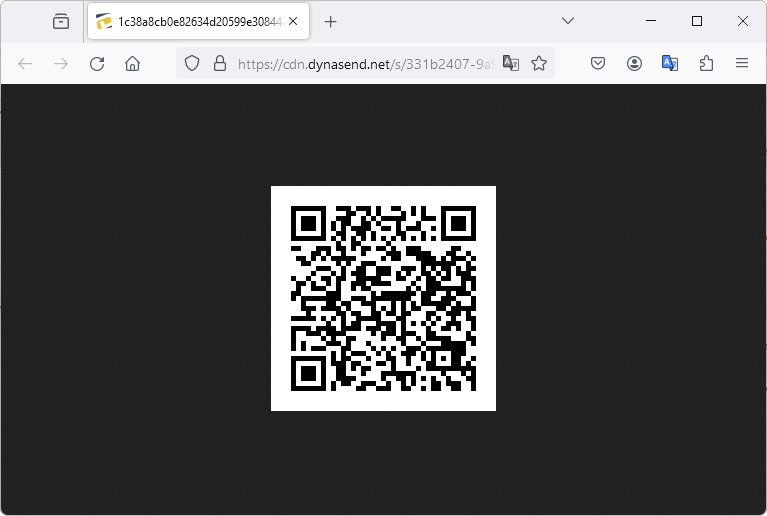
17. How do I access the QR code for a user’s signature?
Open the “Signatures” screen, locate the desired user and click the “eye” icon (view).

Scroll down to the “Formats” section and click “Show All Fields”.

Click the clipboard icon the the right of the QR code URL.
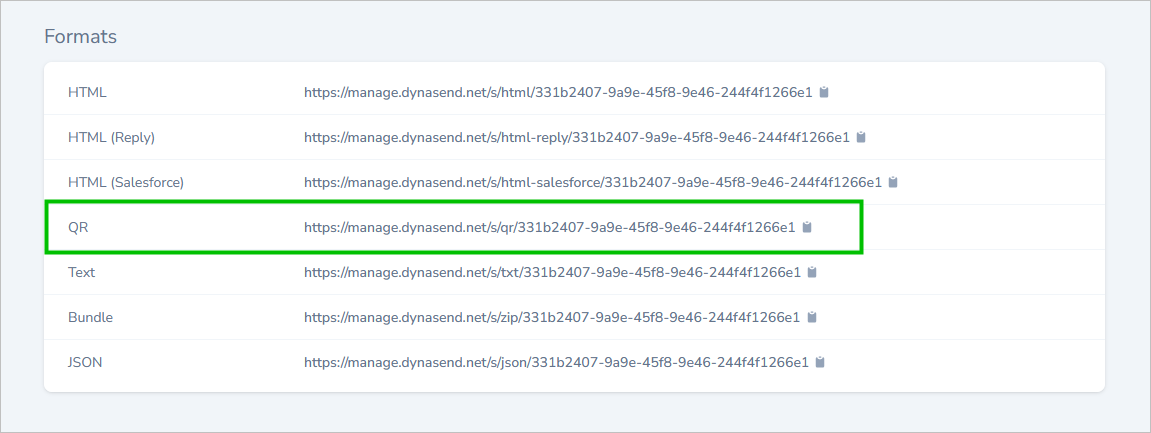
Paste the copied URL into your browser to display the QR code.
18. How can I directly access the HTML file for a user’s signature?
Open the “Signatures” screen, locate the desired user and click the “eye” icon (view).

Scroll down to the “Formats” section.

Click the clipboard icon the the right of the HTML URL - when opened in a browser, this URL will display the signature.
If you need the HTML code itself, you can access it by first displaying the signature in your browser, and then right clicking on the page and selecting “view source” or “view page source” - the code that is displayed is the actual HTML code for the signature.
19. How can I export user data to a spreadsheet?
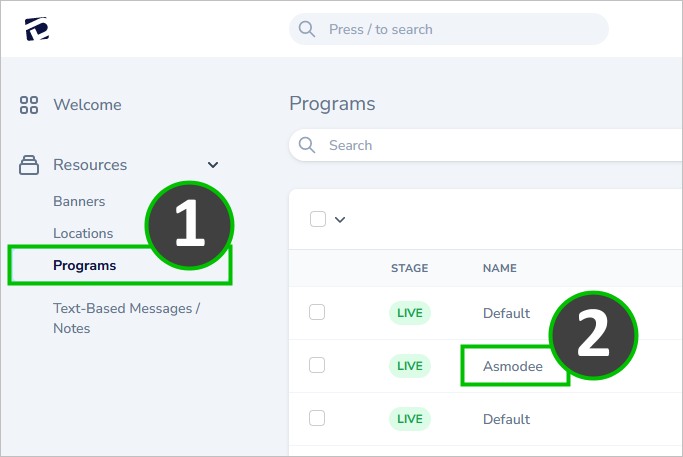
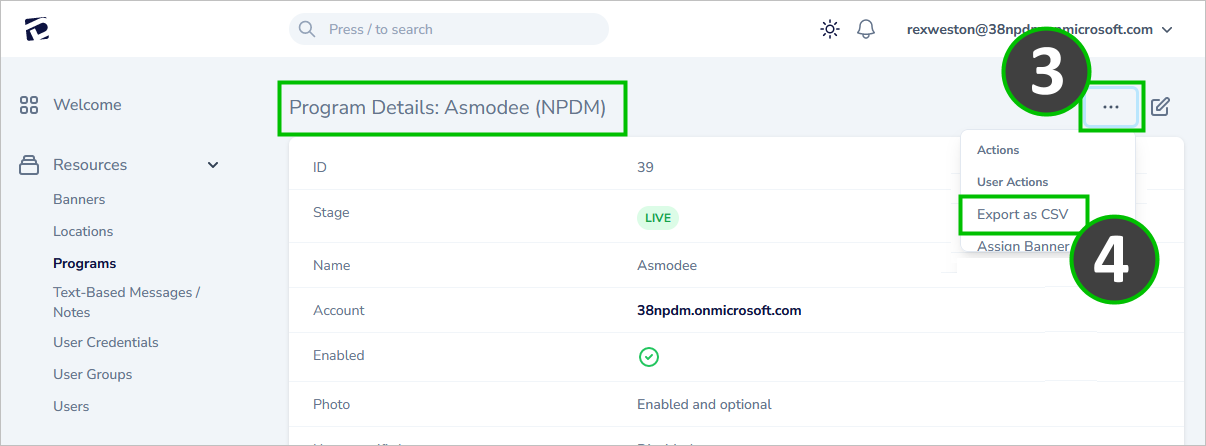
Data exporting has to occur on a program-by-program basis, because different programs may have different data elements (and hence, cannot be combined into one universal CSV file). Follow these four steps to complete the export process:
1.) Click PROGRAMS from the left menu.
2.) Click on a specific PROGRAM.
3.) On the “Program Destais” page, click the three dots.
4.) Pull down to Export as CSV.
20. Can I allow users to disable the signature for replies / forwards?
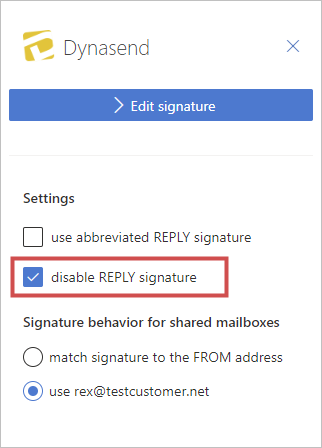
Yes, upon request we will do this for you - but the setting will apply to your entire account (meaning that the option to skip the signature for replies / forwards will become available to all your users). If you would like to allow this for your users, please email us here and we will set this up for you.
When this is turned on, the on / off setting is made in the Dynasend taskpane by the user:
21. Is there a way for me to know when users edit their signatures so that I can review the changes?
We have an optional “verification” procedure that can be turned on upon request. If you’d like access to this feature please email us here and we will activate it for you.
When this is turned on, the notifications settings can be found in the upper right of the manager’s dashboard:

Individual managers can turn the notifications on or off, and you can elect to receive an email notice if you wish:

The email notice will come once a day (if any user edits have occurred) and will give you a link to the verification page:

Or you can reach the verification page from directly within the dashboard itself:

The verification process is done as shown here:
Note: Unverified signatures will be listed. When any manager verifies a signature it will disappear from the list. This allows multiple managers to work on this, without duplication their efforts. Following verification, the user will disappear from the list, until such time as they make another edit to their signature.

Note: You will need to work outside of the verification process to rectify any problems you find - either by correcting the user’s signature yourself, or by reaching out to the user and asking them to correct it.
On the USERS screen, if you access an individual user you will be able to see what manager verified the signature, and when it was done.

22. How do “Invites” work?
You can invite other’s from within your company by using the “invites” feature (in the “Resources” section of the manager’s dashboard):

23. What are roles and how do they work?
Different “roles” in Dynasend can be assigned on an individual basis - the role determines the level of access (permissions) the person has. The roles are:
- User
- Manager
- Developer
- Owner
The access available is as follows:
User (most common): Basically, all users can do is to edit their signature, via the Dynasend user profile (data entry) screen. The degree of access, ranging from no access at all, to complete editing of all fields, is set at a higher level - by Dynasend staff or “Developers (see below)” during the account and program setup process.
Manager (generally just one person or a few individuals): Managers have access to all user permissions, plus they have access to the functionality provided on the “Manager’s Dashboard” - most of which is explained in these FAQ’s.
Developer (a technical role, that is optional): Developer’s have user and manager permissions, plus they have access to every aspect of the signature coding and styling as well as the signature content and data entry form setup.
Owner (one individual): Has the ability to assign / unassign all other roles.
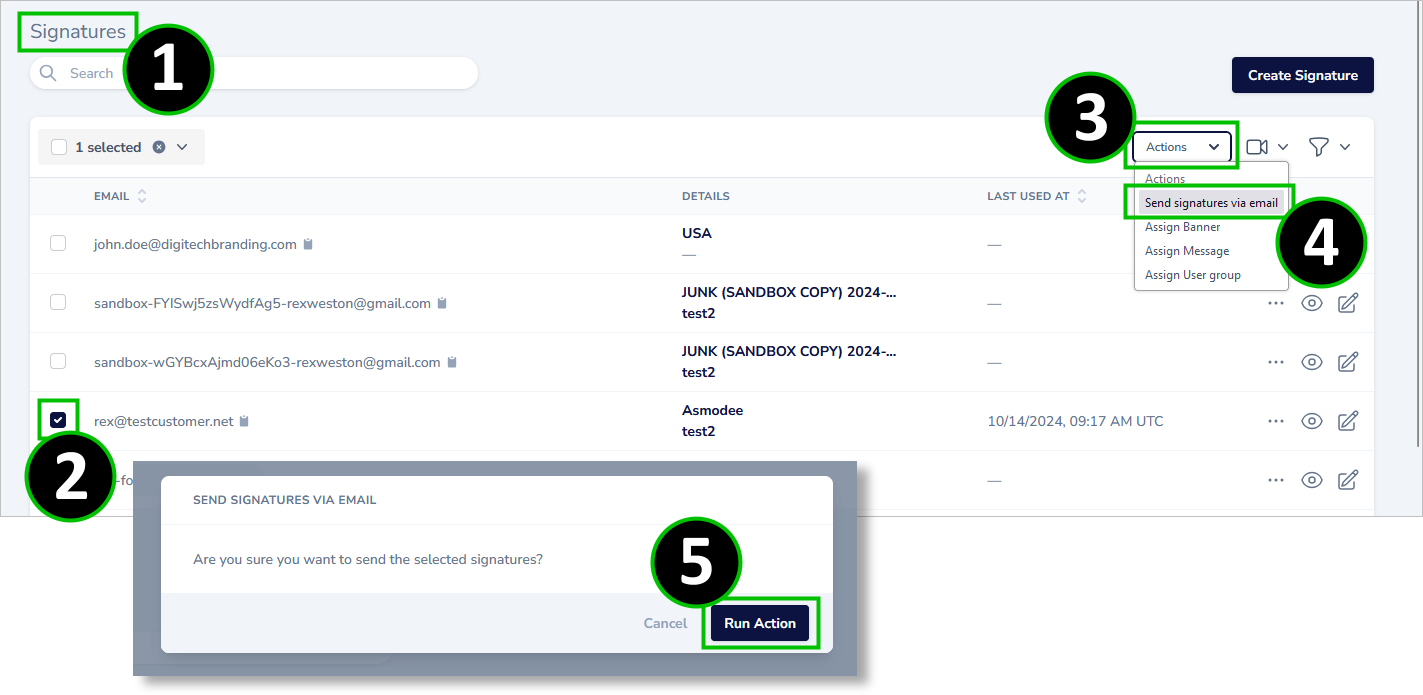
24. Our “iPhone only users” (no computers) use the iOS native email, but can’t access the taskpane - how can I get their signatures to them?
- open the Signatures screen
- select one or more users (using the checkbox)
- access the Actions menu
- click “Send signature via email”
- click “Run Action”
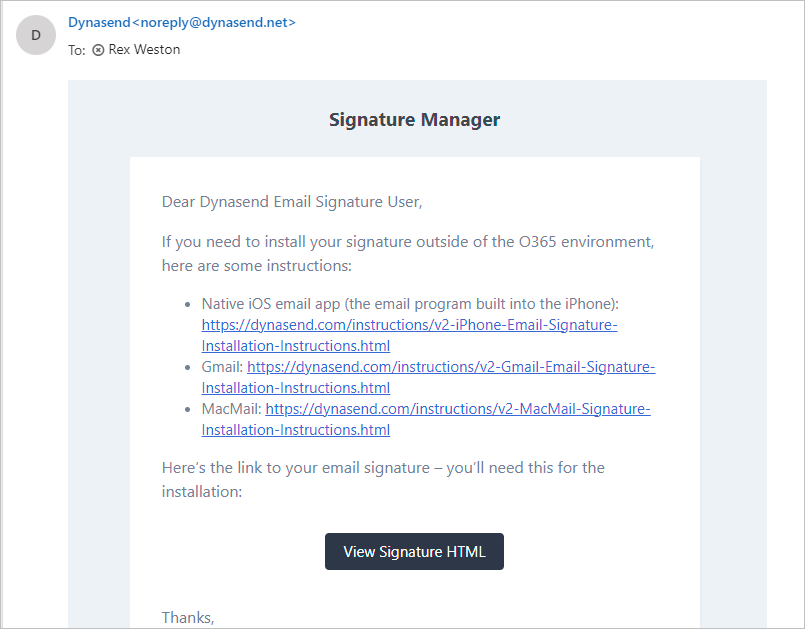
Your user(s) will receive an email with installation instrtuctions as shown below:
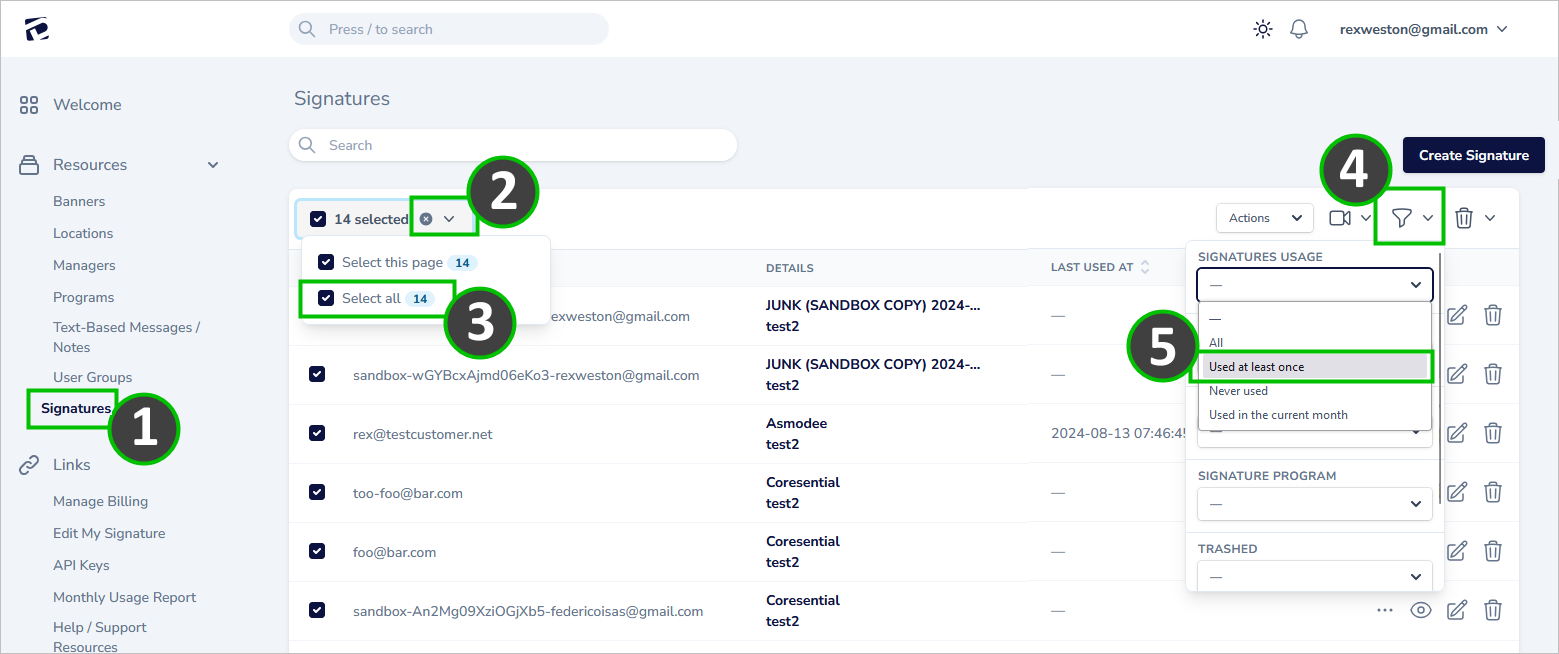
25. How can I see a list of active users?
From the “Signatures” screen:
- select all
- then use the “filter” icon
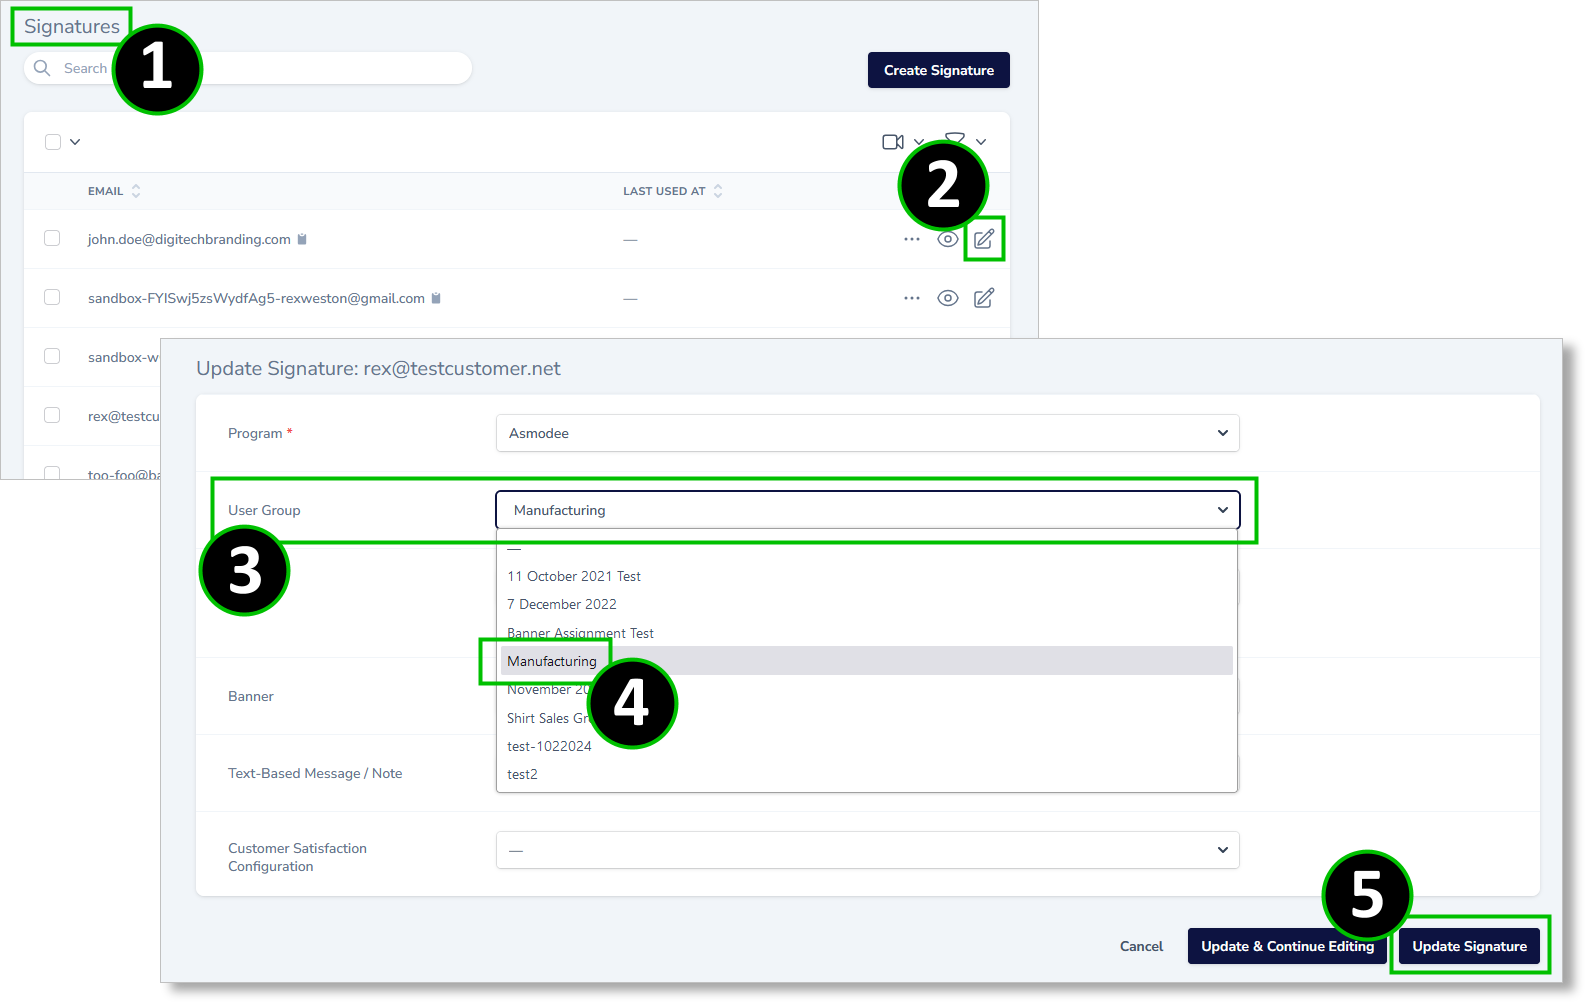
26. How do I add people to a user group?
- Navigate to the the Signatures screen
- Locate the desired user and click the “edit” icon
- Scroll down to the user group section
- Select the desired user group
- Click “Update Signature” at the bottom of the page
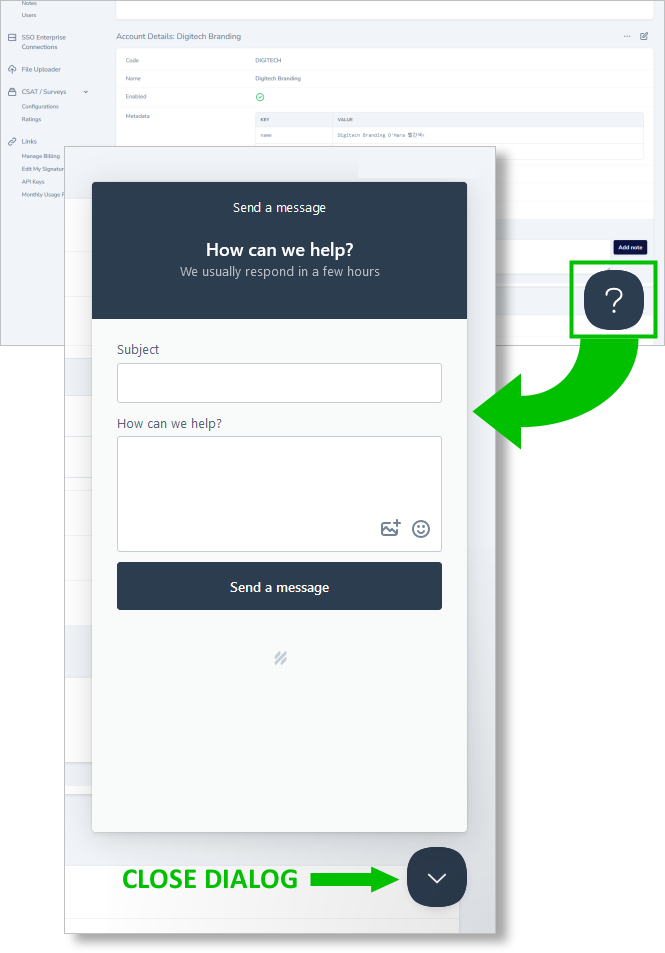
27. How do I access the help desk?
The help desk can be reached from within the manager’s dashboard as shown here:
28. Why are there more signatures than users?
Signatures can be created by managers or by the data coming from active directory.
Users ony appear in the system once they have claimed their signature.
As a result, it’s possible for there to be more signatures than users registered in Dynasend. It’s important to note that and “unclaimed” signature will work fine for a user, it just means that they’ve never logged in to edit it.
29. How do I delete users?
- navigate to the “users” screen
- click the trash can icon next to the user you want to delete
- click “delete resource”
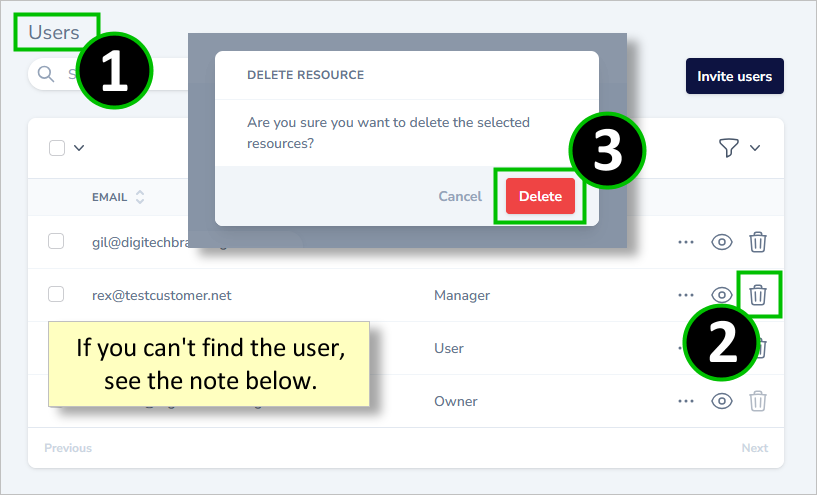
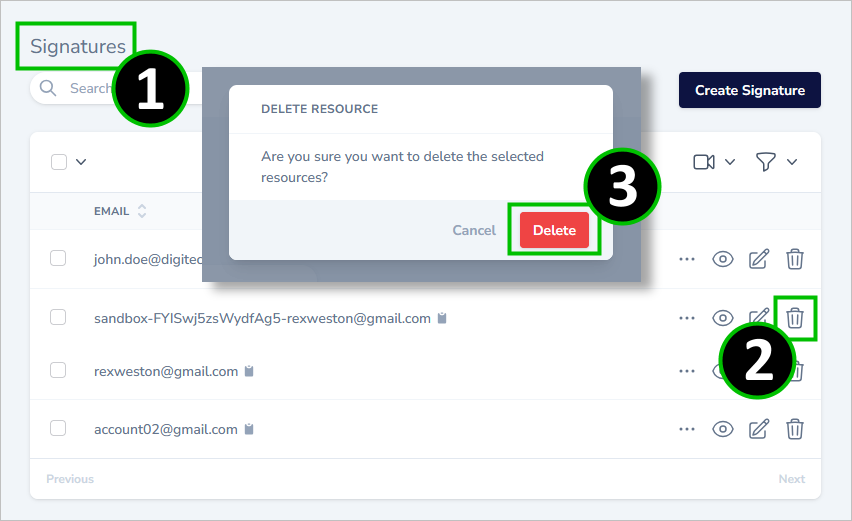
NOTE: If the user you want to delete is not found, it’s because they never claimed their signature. In this case, you need to delete their signature.
- navigate to the “signatures” screen
- click the trash can icon next to the user you want to delete
- click “delete resource”
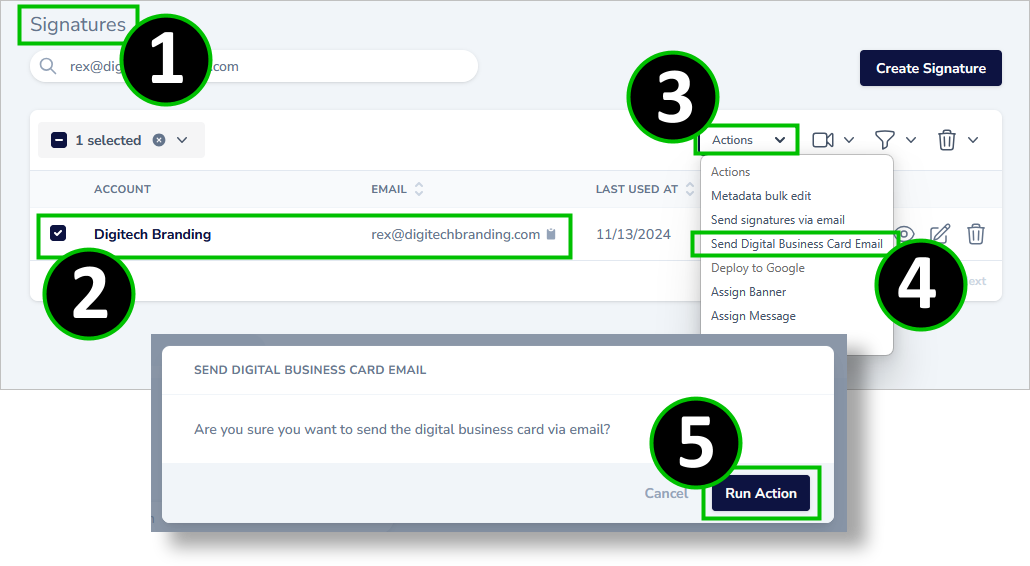
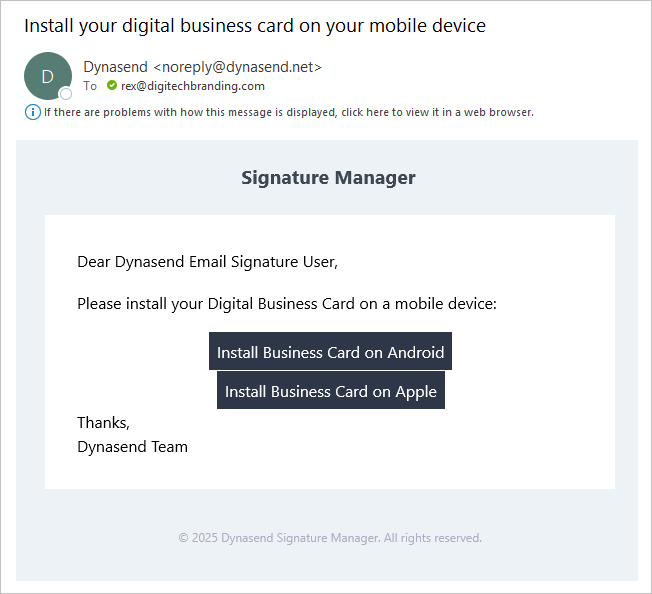
30. How can I distribute digital business cards to my users by email?
- navigate to the “signatures” screen
- select one or mure users
- click “actions”
- select “Send digital business card email”
- click “run action”
your users will then receive this email:
31. We’ve deployed the add-in but not all of our users have created their signature - is there an easy way to send an invite to these “missing” users?
- navigate to the “Add-in missing signatures” feature (found under “Links”
- select one or more users
- click “actions”
- select “Invite users”
- click “run action”
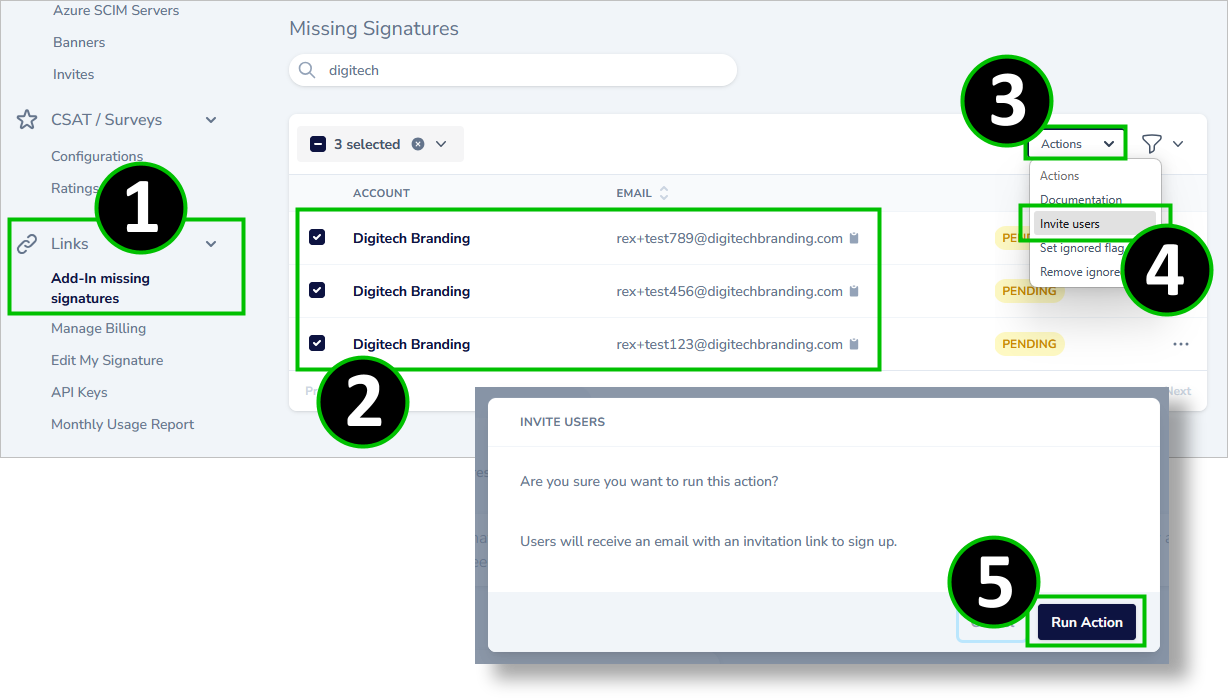
Your users will then receive an email prompting them to complete the process by filling out their signature profile form and saving their signature.
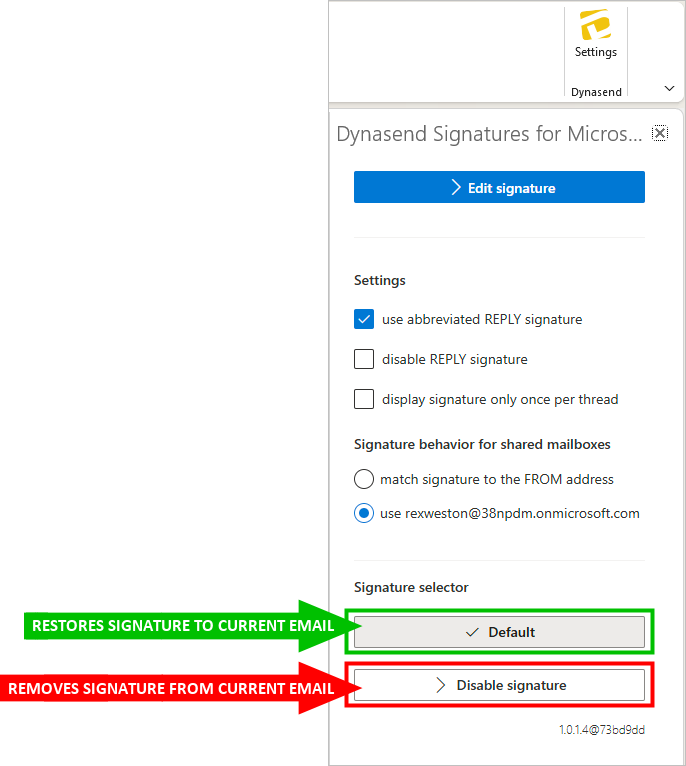
32. Is there a way to remove the signature from a single email message?
This is an account-level feature and is generally not turned on by default. If you would like to give your users access to this, please email us here and we will activate this for your account.

The “Disable Signature” button in the task pane will fully remove the signature from the currently opened message. This is a one-time, message specific, action. The signature operation will return to normal for all subsequent messages.
33. How do I edit an existing signature?
- open the “signatures” dashboard
- search by email address to locate the signature
- click the “three dot” icon
- select “Editor” from the drop-down menu

The editor will appear and you can make, and save, the changes to the user’s signature.
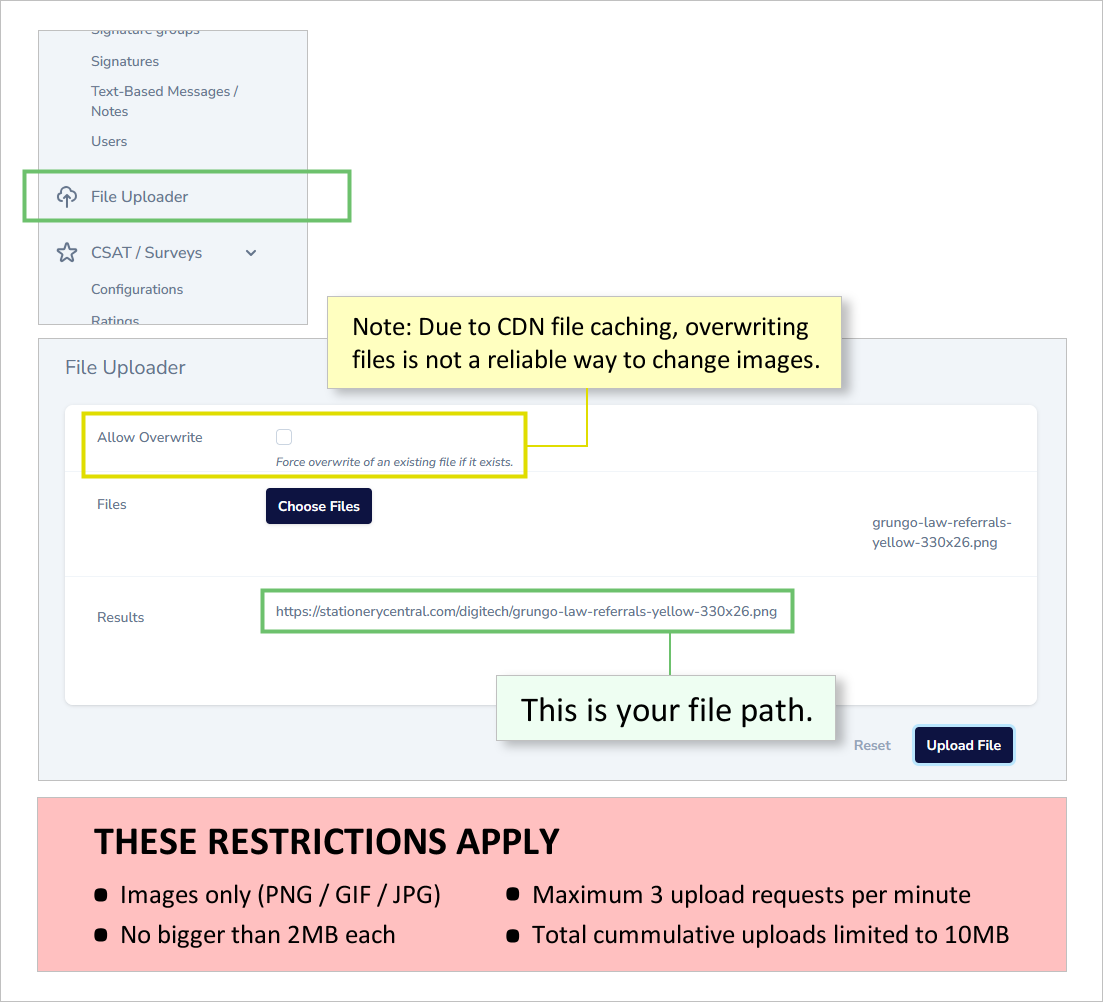
34. What is the file uploader and how do I use it?
On occasion, we will set up a program that enables managers to upload specific graphics and then reference them via a URL entered in the user portal or the locations database. To facilitate this we provide access to a file uploader, enabling you to place these images on our CDN (recommended over using your own server).
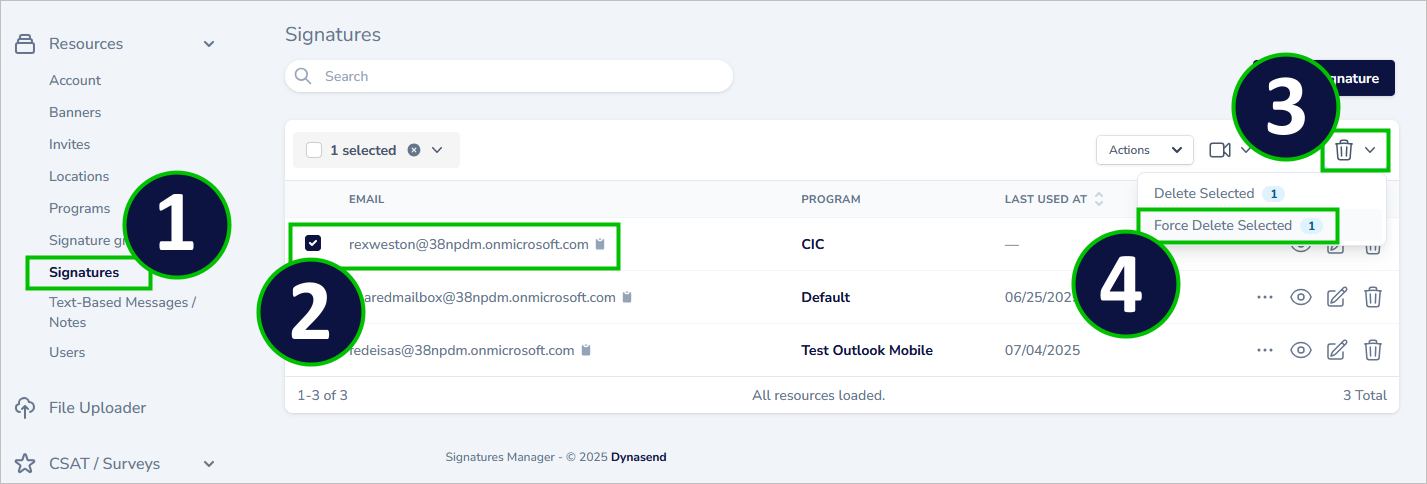
35. What is “force delete” and how do I use it?
By default, deleting resources in Dynasend triggers a “soft delete”, meaning that the resource is not actually gone, but rather is no longer visible in the Dynasend dashboard. The purpose of soft deletes is that it allows the resource to be reinstated if it was deleted mistakenly.
If you want to permanently remove a resouce, a “force delete” is required. Here’s how the the procedure works - illustrated here with the example of force deleting a single sugnature:
36. Is there a way I can preview the reply and/or internal signatures from the dashboard?
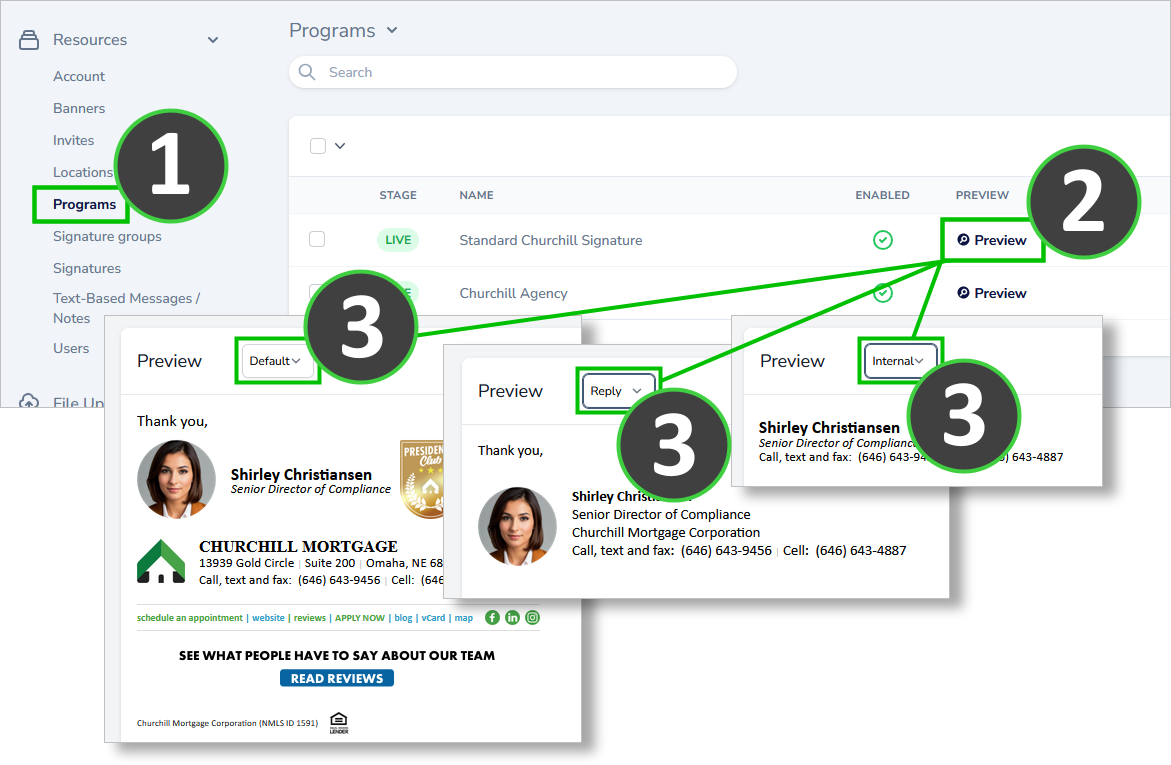
If your program makes use of reply and/or internal signatures you can preview them by doing the following:
- click into the “programs” screen
- click “preview”
- use the drop-down selector above the preview window to view the different signatures
